dgfdg

Loading...
Gadget by The Blog Doctor.
Read more: http://www.blogdoctor.me/2009/01/random-rotating-post-gadget-with.html#ixzz2UMHl8Fc6

Pages

Visions: organize and view your photos in 3D


Visions: organize and view your photos in 3D


Launch most image managers, even for the first time, you’ll feel immediately at home. And that’s because they tend to follow very similar designs. You’ll have album or folder groupings on the left, and image thumbnails on the right; double-clicking something displays it full-screen; right-clicking gives you more options; and in just a few seconds you’ll have a very good understanding of what the program can do.
This is all very easy to use, then. But some say there are better ways to browse your images.Visions, for instance, drops the usual flat folders to present your photos in a configurable 3D interface, which (the developers claim) offers all kind of image management benefits. Really? We downloaded a copy to find out more.
On first launch Visions asks which drives you’d like to check for images. Point the program in the right direction and it’ll scan for folders containing a lot of photos, and each of these will then be represented by a “board”, a page (complete with thumbnails) which you can manipulate in 3D space.
How? Choose “Cylinder” from the Layout list, for instance, and you’ll see multiple boards appear to wrap around your screen. Each one displays the contents of a separate folder, complete with thumbnails. And you can zoom in or out as you like, change the camera view, or select a new layout as appropriate (there are options like “Carousel”, “Colosseum”, “Horizontal Wheel”, “Vertical Wheel” and more).
Visions can present your images in 3D space - but does this really offer any practical benefits?
None of this is particularly intuitive. The kind of click-drag mouse actions you’d expect to work mostly do nothing at all, and instead you have to do things like hold down the space bar as you move the mouse to zoom in or look around.
Once you’ve figured out the navigation basics, though, things improve. And there are some plus points to the system. The ability to view multiple folders at once, for instance, can help when you’re moving files around: just select the images you need on each board, then drag and drop to move them wherever you like. (This can work on an ad hoc basis, too – simply drag and drop folders into Visions as required and it’ll rearrange them according to your current layout.)
Visions isn’t just about its flashy front end, though. The program also has a surprisingly capable “Editing Room”, which has almost 50 fixes, adjustments and effect you can apply (fix colour, brightness, gamma, levels, sharpness, and many more). And while these work with a click, most have further sliders and settings you can use to refine the results.
And just in case that’s not enough, Visions also provides a few desktop publishing-like templates where your photos can be used (postcards, greetings cards, photo albums, calendars and more), as well as allowing you to upload images directly to your Flickr or 23 account.
The program’s 3D navigation system may feel a little cumbersome, then, but if you can master that (or just live with it) then Visions has plenty of other appealing features, and on balance it still earns a thumbs up from us.
DOWNLOAD LINK HERE:

Media Player Classic – BE: a very promising media player


Media Player Classic – BE: a very promising media player


If you’ve ever explored the world of Windows video players then you’ll almost certainly have come across Media Player Classic (compact, easy to use, but a little dated now) and its spin-off Home Cinema project (more powerful, plenty of features).
What you might not have noticed, though, is the latest addition to the family, Media Player Classic-BE (for “Black Edition”, apparently). It’s a recent offshoot from Home Cinema and looks almost exactly the same, but already has one notable addition and plenty of smaller tweaks to enjoy.
Our favourite new addition is the program’s ability to preview different parts of a movie. If you want to view some other section, there’s no longer any need to click various parts of the seek bar until you end up in the right area. Instead, just hover your mouse cursor over a point on the bar, and MPC-BE will show you a thumbnail representing that frame (even if it’s still playing some other part of the video). If that’s not what you need, just move the mouse pointer across the bar, watching as the frames update, and only click when you’re in the right place.

The new preview feature lets you look ahead to any other point in the movie
The down side to this is it does require a fair amount of system resources, so might not work so well on ancient hardware, or if (say) you’re trying to view an HD clip over a slow network connection. Which perhaps is why the feature is turned off by default (click View > Options > Interface and check “Use the preview in the search” to enable it). It worked just fine on our system, though, and could well be enough to justify installing the program all on its own.
Of course the program has more, though.
Support for many minor decoders should help the program import even more file types, for instance (it can even open images now). MPC-BE provides more subtitle options and controls, as well as a new Sub button on the toolbar to help you access them. While there are plenty of smaller additions which may help, just occasionally – like support for the Rotate tag in MP4 and MOV files.
And of course you still have the many great features of MPC-Home Cinema, including its extreme configurability. The program doesn’t just give you access to 180+ options and commands, for instance – it allows you to set up a customisable hotkey for each and every one.
Media Player Classic – BE isn’t exactly a revolution in video playing, then, but it’s a neat improvement on an already good program, and we’ll be very interested to see where the project goes next.

Batch download entire web galleries in a click with NeoDownloader Lite


Batch download entire web galleries in a click with NeoDownloader Lite


Browsers are fine for displaying content, but not nearly as useful when you want to download it, and this is especially true with web galleries. No matter how simple the collection of images, you’ll still probably have to work them all manually, right-clicking each in turn and trying to figure out the appropriate option (“Save as”, “Save link as”, whatever it might be).
If you’d prefer an easy life, though, you could forget all the usual hassles and turn to NeoDownloader Lite, instead. While the program has some issues, it’s still a great way to simplify and speed up the process of downloading images from the web.
And the program’s advantages start immediately, with the option to sample a Repository of almost 50 projects across a range of categories: “Digital Art”, “Photography”, “Funny”, “Wallpapers”, and “Girls and Celebrities” (the latter is mostly just celebs in bikinis and similar shots, nothing likely to offend based on our observations, although if you’re concerned about age appropriateness then you might want to check it out).
Getting started was extremely easy, too. We just chose a project – “Windows 7 Wallpapers”, clicked Start, then watched as the program downloaded and displayed more than 120 gorgeous high resolution photos. There are thousands of other images just waiting to be accessed, and if you’re after some quality wallpapers then these sample projects could justify installing NeoDownloader Lite all on their own.
The program grabs images from your chosen site, then displays then via its built-in viewer
Of course in reality, though, you’ll probably want to try downloading images from a few URLs of your own, and that’s also fairly straightforward, at least initially. Simply drag and drop a URL from your browser onto NeoDownloader, create a new project, and it should begin downloading. But if there are problems, then you can tweak the settings in various way to try and improve its results.
As we mentioned, there are issues here. This free version of NeoDownloader is restricted to a download speed of 128 Kb/s, for instance; it can only grab 3 images simultaneously, and a maximum of 2000 per project.
And while downloading images from your own choice of sites usually just works, if there are issues then it’s not always very obvious what to do. At the core of NeoDownloader Lite is a very powerful offline browser, and there are plenty of options to explore, none of which are particularly well documented.
Still, if you’re looking for an easier way to bulk download images from at least some sites thenNeoDownloader Lite should prove a useful tool. Its Repository alone is a great collection of graphics links.
And if you like the program, it might also be worth checking out the full commercial NeoDownloader program. This removes the download speed and other restrictions, adds the ability to batch download any other content type (music files, videos, archives, more), and allows you to download from password-protected sites, amongst other extras.

Resonic: a fast, easy-to-use new music player


Resonic: a fast, easy-to-use new music player


The PC market for audio players is a little on the crowded side, with free tools to do just about anything you want, so it’s not exactly easy for new programs to make an impression. There are still companies queuing up to try their luck, though, and the latest contender is Resonic, an interesting tool now available in its first public alpha release.
Why should you care? Developers Liqube clearly understand they have to get the fundamentals right first, and the program duly offers support for a host of audio formats. The current list is MP3, MP2, MP1, OGG, M4A, MP4, AAC, MPC, MP+, OPUS, SPX; WMA, WMA Pro, WMA Lossless; WAV, AIFF, FLAC, APE, ALAC, WV, TTA; IT, XM, S3M, MTM and MOD: sounds good to us.
Resonic’s Explorer-like interface makes the program easy to use, too. Just choose a folder and it’ll cycle through each of the songs in sequence (although the usual “shuffle” and “repeat” options are also available).
And whatever playback mode you’re using, as soon as a particular track begins you’ll see a waveform for that song, sometimes handy when you need to seek to some other point. Although if you don’t need it, this can be replaced with a couple of alternative visualisations (the Linear Analyzer or Logarithmic Analyzer) in a click or two.

Resonic will play the contents of any folder you choose
If you like to control your audio players from the keyboard then the good news is that there are hotkeys for all the main Resonic playback actions (although they’re not yet customisable). And the program includes some nice extra touches, too. So if you need to talk to someone, say, holding down the space bar will conveniently drop the master volume right down, restoring it to normal when you’re done.
Browse the menu and there are one or two small but welcome extras to be found. Like the built-in timer, for instance, which can be set up to sleep, hibernate, lock, log off or power down your PC after a defined period of time.
And we noticed a few thoughtful touches elsewhere. So if you click the “resonic” logo, for instance, instead of just blindly opening its home page, a message explains that the program now wants to launch your web browser, and politely asks if that would be okay with you. A small thing, but it works – immediately you get the feeling that this is a tool you can trust, something which isn’t going to install a browser toolbar (or anything else even faintly dubious) without getting your express permission.
Resonic doesn’t have any single killer feature which would compel you to use it, then. But then it’s only an early alpha version, and already the program is fast, capable, and easy to control and use. If you’re in the market for a simple audio player, take a look: otherwise, keep an eye on any future releases – it’ll be very interesting to see how the program develops.
DOWNLOAD HERE:http://uploading.com/95ecf41m/ResonicAlphaPortable-zip

AstroGrep: a simple, flexible Windows search tool


AstroGrep: a simple, flexible Windows search tool


Are you tired of the standard Windows search tool? You’re not alone. Its indexing component is difficult to control, and uses too many resources; we’ve found the index can become corrupted for no apparent reason; and filtering the results just isn’t as easy as it needs to be.
Fortunately there are plenty of interesting alternatives around, andAstroGrep is one of the best: compact, powerful yet also simple to use, it’s a search tool which should appeal to just about everyone.
The program’s first advantage is its portability. There’s no setup here, no installation, no annoying indexing module – just unzip the core files (which require barely 300KB of disk space) and it’s ready to run just about anywhere.
The interface is well designed, too. AstroGrep is mostly about searching your system for documents containing specific keywords, and it only takes a moment to enter your search text, and tell the program where to look.
AstroGrep's preview pane highlights any matches for your search keywords
If you need more, though, just scrolling down reveals plenty of options. So you can limit your search according to their size or modification date, for instance. Or turn on regular expression support for even more powerful search possibilities.
And the good news continues when you’re defined your query, and clicked “Search”. AstroGrep displays matches as they’re found, no need to wait until it’s finished. And clicking any file in the list displays a preview of the document, with your keywords highlighted, which could be useful when picking out the matches you need.
There are some problems, of course. The most notable being that, because there’s no indexing, the program must crawl your hard drive for every search, which is always going to cut performance.
Still, even here there are things you can do. Making sure to search only the path you need is key, but there are also options to skip hidden or system files or folders, as well as the ability to exclude particular file types from the search entirely.
Put it all together, then, and we find AstroGrep is fast enough for most purposes, and its mix of power, portability and ease of use make for an excellent all-round PC search tool.

MakeMKV 1.7.10 Beta is your one-click solution to ripping media to your hard drive


MakeMKV 1.7.10 Beta is your one-click solution to ripping media to your hard drive


Everyone’s looking for that magic one-click solution to digitizing their personal video and movies collection. Often you find yourself having to jump through a number of hoops before you can get the movies in a format you like, but if you’re looking for a perfect 1:1 rip in MKV format, then MakeMKV 1.7.10 Beta is the tool for you.
MakeMKV 1.7.10 runs on Windows and Mac, and lets you simply select your DVD or Blu-ray disc, pick an output folder and click a button to rip it. Better still, it produces a 1:1 copy in much less time than other tools, and is completely free to use while in beta.
MakeMKV works with both physical discs and previously ripped ISO files. If quality is king, then this is the tool for you as it always produces an exact digital copy with no compression in the popular MKV format using the video’s original codecs. From here you can simply add the file to your media collection, or if you’re looking to convert it into a different format for compatibility purposes or to produce a smaller, compressed file, load it into another app such as Handbrake for Apple-friendly MP4, or Freemake Video Converter for a wider choice of output formats.
Rip DVDs and Blu-rays to MKV format quickly and easily with MakeMKV Beta.
MakeMKV reads both DVD and Blu-ray discs, including protected formats, although support for Blu-ray will only be free while the app remains in beta. The output file preserves all video and audio tracks (including HD) as well as chapter information and other meta-data, although there’s no facility for editing this within the app itself.
The key thing to recommend MakeMKV is the speed of the conversion – it’s basically hampered only by the read speed of your drive, which makes it worth considering even if you’re subsequently looking to convert the file elsewhere but have problems reading it from the original disc.
The program is undergoing rapid changes – the latest build just released improves handling of DVD discs with mastering errors and adds unspecified “miscellaneous improvements”. Other notable changes in recent months include support for AACS v35, an updated BD+ engine and the addition of two profiles (WDTV and FLAC), accessible from the Advanced tab of the program’s Preferences dialog (users must first tick “Expert mode” on the General tab to make this visible).
MakeMKV 1.7.10 Beta is a free-during-beta download for Windows and Mac. Beta versions work without registration for 30 days, after which users must insert a free beta key to continue using all the program’s functionality. This can be found on the program forum. When this expires, a new beta key can be found at the same link, or users can opt to purchase the full version ahead of its final release.

Edit, check, back up and manage your HOSTS file with HostsMan


Edit, check, back up and manage your HOSTS file with HostsMan


The Windows HOSTS file is based on a simple idea – it just redirects specific domain names to your preferred IP address – but this has some very useful applications. If you want to block access to a particular website, for instance, just add its domain name to HOSTS, point it to an IP address representing your local system (127.0.0.1, usually), and you won’t be able to reach the site in any browser.
But that’s just the start. You could also use HOSTS to block advertising servers, and known malicious sites. And sometimes malware will tweak your HOSTS file to gain control over your internet access. If you want to review all this then you could just open HOSTS in Notepad, but HostsMan could be a much better option – it’s a compact, portable and free HOSTS file manager with a stack of features.
Launch HostsMan as an administrator and you might start by viewing your own HOSTS file. Click Editor, the file will appear, and you can browse it to see what entries (if any) it contains.
There are plenty of editing options here. Right-click and you’ll find options to create, edit, disable or delete entries, copy them to and from the clipboard, and add comments. An Edit > Find option contains a powerful search feature, with regular expression support, to help you locate particular entries. And useful management features include options to delete the empty lines in a file, the comments, and more.
It looks very basic - but beneath that compact interface is a very powerful HOSTS file manager
And better still, if you’re worried about malware then you can ask the program to look for possible hijacked HOSTS entries, or just display any which have been created or modified recently.
HostsMan has another very useful security function elsewhere, though in its Hosts Updater. This provides built-in access to seven popular HOSTS files which can help to block ad servers, known malicious sites, and so on. You can add more sources if necessary, then import these to update your own HOSTS file.
It’s worth keeping in mind that an incorrectly updated HOSTS file can cause problems, perhaps blocking access to sites you’d like to reach (especially relevant as this is a beta version, and bugs are to be expected). Fortunately HostsMan also includes a backup tool where you can save your current HOSTS file, and restore it later if necessary. Click Tools > Backup Manager, then Create Backup to save your current HOSTS. Or, if you want to return to the default Windows HOSTS setup with no redirections at all, click “* Original Hosts *” > Restore Backup.
And just in case this isn’t enough, HostsMan also contains several time-saving shortcuts. If a HOSTS file change doesn’t work right away, for instance, it could be because Windows has cached the previous IP address; click Tools > Flush DNS Cache to try again. Or, if you want to update or access the file yourself, there’s no need to manually browse to it: just click Tools > Open Hosts Folder, and there are menu entries to open it in Explorer, a command window or PowerShell.
There are plenty of powerful functions here, and as HostsMan 4 is also in beta right now it’s probably not a good choice for networking beginners.
If you’re already used to exploring your HOSTS file, though, the program should prove an excellent assistant which will make the management process very much easier.

TIME AND WORK


  1. TIME AND WORK

    1.Work from Days:
    If A can do a piece of work in n days, then A's 1 day's work =1.
    n
  2. Days from Work:
    If A's 1 day's work =1,then A can finish the work in n days.
    n
  3. Ratio:
    If A is thrice as good a workman as B, then:
    Ratio of work done by A and B = 3 : 1.
    Ratio of times taken by A and B to finish a work = 1 : 3.
    EXAMPLES
    1.A can do a work in 15 days and B in 20 days. If they work on it together for 4 days, then the fraction of the work that is left is :

    a) 1/4        b)1/10        c)7/15      d)8/15

    Answer: Option d
    Explanation:
    A's 1 day's work =1;
    15
    B's 1 day's work =1;
    20
    (A + B)'s 1 day's work =(1+1)=7.
    152060
    (A + B)'s 4 day's work =(7x 4)=7.
    6015
    Therefore, Remaining work =(1 -7)=8.
    1515

EXTEND THE WINDOWS RUN BOX WITH RUN-COMMAND 1.00


Extend the Windows Run box with Run-Command 1.00

The Windows Run box has always been a quick and easy way to launch programs, but it’s not exactly packed with features. You can specify an application to launch, choose something you’ve run recently from the History list, and, well, that’s about it.
You don’t have to live with these limitations, though. Grab a copy of the new Run-Command and it’ll take your Run box to a whole new level.
The program is a tiny download (42KB), so you can just unzip and  go. And it’s extremely portable. There are no .NET or other major dependencies, and the author says it’ll run on anything from Windows 98 to 8.

Launch Run-Command and at a minimum it’ll work more or less like the regular Run box. You can enter a URL, file or folder name (or browse to it), press Enter or click Run and it’ll launch as usual.
There’s also a button to run programs as an administrator, though. (You can do the same thing from the regular Run box by entering a program name and pressing Ctrl+Shift+Enter, if you remember, but this is certainly easier.)

It's the Run box, with extras: buttons, icons, even a whole Start Menu-type system
There are easy ways to launch commonly-used tools. So for instance Run-Command has built-in icons for Regedit, Cmd.exe, the Computer Management and System Properties dialogs, and more.
There’s even a customisable Favorites system, which acts something like a mini Start menu. It comes with built-in links to many system tools, but you can also add more of your own. And if you’re using Run-Command from a USB stick then this could help you to create your own portable working environment.
Through all of this the program does its best to stay out of your way, by default minimising to the system tray. But it’s easy to launch via the regular Win+R key (although you can change this to whatever you like). And background RAM use is reasonable at around 7MB.
There is also one annoying bug. Our test PC happened to have the display of icons on the desktop turned off, but we noticed that launching Run-Command (and closing it) caused them to be displayed again. There’s no harm done, you can just hide them once more, but it still quickly becomes extremely irritating.
This may not be an issue which applies to all systems, though. And if you allow icons to be displayed on your desktop then this won’t be an issue, anyway. So if you’re interested in the idea, don’t let this put you off: just download Run-Command and see how it works for you.

HIDE FILES AND FOLDERS WITH COMMANT PROMPT

HIDE FILES AND FOLDERS WITH COMMANT PROMPT


Hello Guys. I hope you all are fine. Its Exams time, Manny must be busy with studies like me. 

So today we gonna see how to hide Files And Folders With Command Promt.

Earlier we already saw How to Create Password protected files/Folders without software , Today we will see how to hide Files and Folders with Command promt. If you have any personal or confidencial data in your pc and you dont wanna let other to peep it. then this trick will be very helpfull to you.

So lets get started with it.

For instance: Say you have a folder with name "Photos" which is stored in drive " D "  and you think strangers should not see this folder then to hide that folder do the followings. 

STEPS :

  1. Press Windowskey + Run , Run command will appear.
  2. In that type cmd and press enter. This will open Command prompt 
  3. Now Type "attrib +s +h D:\Photos" then press enter. 
  4. Thats it your folder is now hidden, if not thenthere will be some mistake done by you. (you will have to change the directory accordingly.once hidden it cannot be viewed by any search option.)
  5. Once hidden, now you want to unhide it again, simply use the same command but replace '+' with '-' on both flags 's' and 'h' (For eg : "attrib -s -h D:\Photos" )

HOW TO HIDE TEXT IN IMAGE FILE

HOW TO HIDE TEXT IN IMAGE FILE


Hi Guys. Today we will see how to hide TextMessage in any image file.
This is an awesome trick and very easy one too. IF you wish to send a text messega to you friends privately or you yourself want to hide a textmessage in image file then this article will help you a lot.


After hiding the message in a image file there will be no damage to the file just the size of the file will increase a bit.

So lets check how it is done.

First of all open run and type cmd., click enter. This will open Command promt.
Now you have to navigate to the folder where you have copied the files(1 .jpg file and 1 txt file which contains your message.)


For example, if your files are in "D" drive, then after opening cmd, type, D: and hit enter, now you are in your d drive, now if your folder name is Photos then type "cd photos"  (without quotes) now you are in photos folder.

Now main step. Type this command after navigating to the folder.


copy /b imagefilename.jpg + textfilename.txt outputimagename.jpg
Type the exact code, but dont forgot to replace the few words, imagefilename.jpg with your image file name and with proper extension, textfilename.txt with your text file, outputimagename.jpg your output image name, use whatever you want, but remember to use right extension.All done by now your message has been hiden in you image and a new folder will be created in the same folder with the name you wrote in place of outputimagename.jpg.

As everything is done by now. you must be thinking how to view the message now.
dont worry we will see that too. its very simple .
You just have to open the output file with notepad, scroll down to the bottom. check the last line.
you message will be displayed there.

HTML Editors


HTML Editors


Writing HTML Using Notepad or TextEdit

HTML can be edited by using a professional HTML editor like:
  • Adobe Dreamweaver
  • Microsoft Expression Web
  • CoffeeCup HTML Editor
However, for learning HTML we recommend a text editor like Notepad (PC) or TextEdit (Mac). We believe using a simple text editor is a good way to learn HTML.
Follow the 4 steps below to create your first web page with Notepad.

Step 1: Start Notepad

To start Notepad go to:
Start
    All Programs
        Accessories
            Notepad

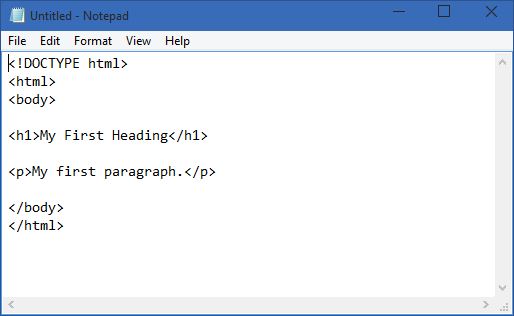
Step 2: Edit Your HTML with Notepad

Type your HTML code into your Notepad:
Notepad

Step 3: Save Your HTML

Select Save as.. in Notepad's file menu.
When you save an HTML file, you can use either the .htm or the .html file extension. There is no difference, it is entirely up to you.
Save the file in a folder that is easy to remember, like w3schools.

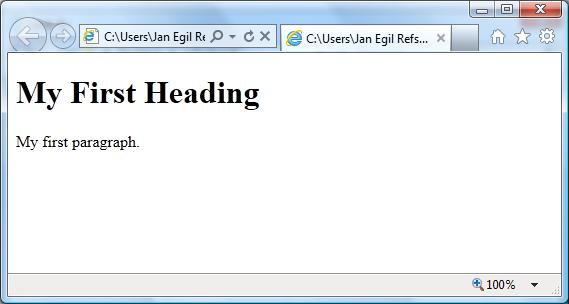
Step 4: Run the HTML in Your Browser

Start your web browser and open your html file from the FileOpen menu, or just browse the folder and double-click your HTML file.
The result should look much like this:
View in Browser